ETL Test Stand Firmware
Firmware for KCU 105
- Vivado version: 2021.1
Loading the firmware using programming script
Make sure the JTAG port of the KCU board is connected, and Vivado is properly sourced (e.g., source /media/data_hdd/Xilinx/Vivado/2021.1/settings64.sh on strange.bu.edu).
The latest version of the firmware can be obtained from the CLI on gitlab using the get_firmware_zip function:
get_firmware_zip() {
    version=$1
    project="etl_test_fw"
    projectid="107856"

    file=$project-$version.zip
    url=$(curl  "https://gitlab.cern.ch/api/v4/projects/${projectid}/releases/$version" | jq '.description' | sed -n "s|.*\[$project.zip\](\(.*\)).*|\1|p")
    wget $url
    unzip $file
}
get_firmware_zip v2.1.11.
This will download and unpack the firmware into a directory like etl_test_fw-v2.1.11.
Within the directory run source program.sh.
The script will list all connected KCU boards. Select the one you want to reprogram (if more than one is found).
To program faster you can skip programming the flash.
Loading the firmware using the Vivado GUI
Alternatively, the firmware can be loaded manually by opening Vivado:
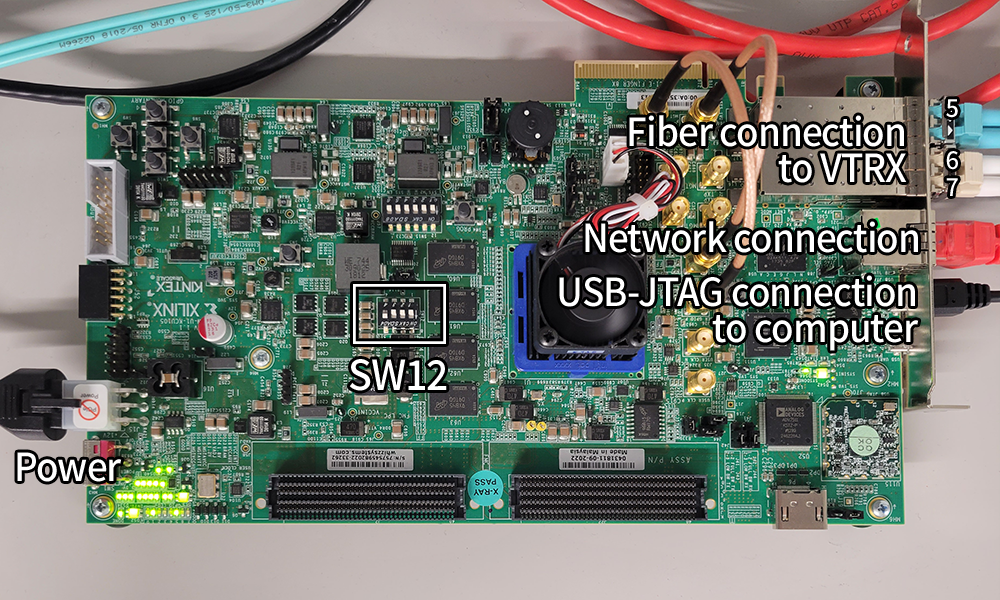
- Connect JTAG USB connector to computer
Open Hardware manager
Open target->auto connect. If multiple boards are connected, make sure you select the right one.
- Right click on
xckuand thenProgram Device.
- Select
Bitstream fileand[...], and look for the firmware directory (e.g. etl_test_fw-v1.2.3). Select the.bitfile and then clickProgram. (Firmware releases on gitlab)- If firmware was loaded correctly, single or double cylon mode should run on the KCU board LEDs


- If firmware was loaded correctly, single or double cylon mode should run on the KCU board LEDs
Loading the firmware persistently
The KCU105 has a dual Quad-SPI memory which allows a firmware image to be persistently programmed onto the board. The dual configuration allows for programming from two SPI flash memories in parallel (programming 8 bits per clock cycle).
To load the firmware into the flash to keep it even after a power cycle:
- Right click on FPGA (i.e.
xcku),Add Configuration Memory Device
- Scroll down the
Select Configuration Memory Partlist and search formt25qu256-spi-x1_x2_x4_x8. Select OK.
Do you want to program the configuration memory device now?OK.- In the
Program Configuration Memory Devicemenu: - Set
Configuration fileandConfiguration file 2to the primary and secondary.mcsfiles - Set
PRM fileandPRM file 2to the primary and secondary.prmfiles - The default selections of
EraseProgram, andVerifyare ok. -
Click
OK
Emulator Firmware
- Quartus 21.1.0
- Needs a USB blaster. Restart computer with blaster connected if there a troubles with Quartus finding the blaster.
Load firmware
Some instructions can be found here to load the firmware through quartus GUI
- Start Quartus, open a project and recompile if necessary
-
Start the
Programmer, selectAdd File...and load the default.soffile onto the board, or load a.jicfile premanently on flash memory

To avoid using the GUI one can use the quartus command line tools:
Add quartus to your path if you haven't done so, e.g. export PATH=$PATH:/opt/intelFPGA_pro/21.1/quartus/bin/ on strange.bu.edu.
- To load the
.soffile to the emulator board:
quartus_pgm -c 1 -z --mode=JTAG --operation="p;<path/to/file.sof>@1"
where -c specify the blaster to use (useful if you have more then 1 connected at the same time), -z stops the on-chip auto-configuration controller of the device to allow programming via the JTAG interface, which is set with --mode=JTAG.
--operation allows to specify the programming operation (p=program) and set the target (@1).
- to convert a
.soffile into a.jicfile:
quartus_cpf -c -d MT25QU256 -s 10CX220Y <path/to/file.sof> <path/to/file.jic>
where -c specify the conversion operation, -d MT25QU256 -s 10CX220Y specifies the device name and type.
- to load the
.jicfile:
quartus_pgm -c 1 -z --mode=JTAG --operation="ip;<path/to/file.jic>@1"
where the i option in the operation tells the programmer to configure the board after the .jic is loaded on the flash memory